
Tkinter is Python’s most popular built-in library for creating graphical user interfaces (GUIs). Whether you’re building simple desktop applications or complex data visualization tools, Tkinter provides a powerful yet beginner-friendly toolkit. This comprehensive guide will help you master Tkinter from fundamentals to advanced techniques.
What is Tkinter and Why Use It?
Tkinter is the standard Python binding to the Tk GUI toolkit, included by default in most Python distributions. It allows developers to create cross-platform desktop applications with minimal setup required. Unlike other GUI frameworks, Tkinter requires no additional installation on most systems.
Advantages of Tkinter
- Built-in: Ships with Python by default—no extra installation needed
- Cross-platform: Works seamlessly on Windows, macOS, and Linux
- Lightweight: Minimal dependencies and fast execution
- Easy to learn: Intuitive syntax perfect for beginners
- Well-documented: Extensive official documentation and community support
- Flexible: Handles simple dialogs to complex applications
Getting Started: Your First Tkinter Application
Let’s create a basic Tkinter window to understand the fundamental structure:
import tkinter as tk

# Create the root window
root = tk.Tk()
root.title("My First App")
root.geometry("400x300")

# Add a label
label = tk.Label(root, text="Hello, Tkinter!")
label.pack()

# Run the application
root.mainloop()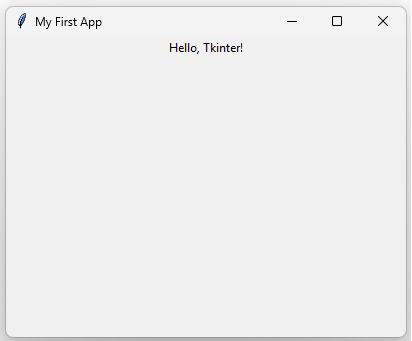
This simple script demonstrates the three essential steps in any Tkinter application: create a root window, add widgets, and start the event loop with mainloop().
Understanding Tkinter Widgets
Widgets are the building blocks of Tkinter applications. Each widget represents a GUI component like buttons, labels, text fields, or checkboxes.
Essential Tkinter Widgets
Label Widget
Labels display text or images on the interface:
label = tk.Label(root, text="Enter your name:", font=("Arial", 12))
label.pack()
Entry Widget
Entry widgets collect single-line text input from users:
entry = tk.Entry(root, width=30)
entry.pack()
text = entry.get()  # Retrieve the entered text
Button Widget
Buttons trigger actions when clicked:
def on_click():
    print("Button clicked!")

button = tk.Button(root, text="Click Me", command=on_click)
button.pack()
Text Widget
Text widgets enable multi-line text input and display:
text_widget = tk.Text(root, height=10, width=40)
text_widget.pack()
content = text_widget.get("1.0", tk.END)  # Get all text
Listbox Widget
Listboxes display selectable lists of items:
listbox = tk.Listbox(root)
listbox.insert(0, "Item 1")
listbox.insert(1, "Item 2")
listbox.pack()
Checkbutton and Radiobutton
These widgets handle multiple choice inputs:
var = tk.BooleanVar()
checkbox = tk.Checkbutton(root, text="I agree", variable=var)
checkbox.pack()

radio_var = tk.StringVar()
radio1 = tk.Radiobutton(root, text="Option 1", variable=radio_var, value="opt1")
radio2 = tk.Radiobutton(root, text="Option 2", variable=radio_var, value="opt2")
radio1.pack()
radio2.pack()
Tkinter Layout Managers
Layout managers control how widgets are arranged in your window. Tkinter provides three main approaches:
Pack Layout Manager
The simplest layout manager, packing widgets sequentially:
label1 = tk.Label(root, text="Top")
label1.pack(side=tk.TOP, fill=tk.X)

label2 = tk.Label(root, text="Bottom")
label2.pack(side=tk.BOTTOM, fill=tk.X)
Grid Layout Manager
Grid provides precise control through rows and columns:
label = tk.Label(root, text="Name:")
label.grid(row=0, column=0, sticky="w", padx=10, pady=10)

entry = tk.Entry(root)
entry.grid(row=0, column=1, padx=10, pady=10)

button = tk.Button(root, text="Submit")
button.grid(row=1, column=0, columnspan=2, pady=10)
Place Layout Manager
Place allows absolute positioning using coordinates:
button = tk.Button(root, text="Fixed Position")
button.place(x=50, y=50, width=150, height=30)
Handling Events in Tkinter
Events are user interactions like button clicks, key presses, or mouse movements. Tkinter uses callbacks to handle events:
def handle_click(event):
    print(f"Button clicked at ({event.x}, {event.y})")

button = tk.Button(root, text="Click me")
button.pack()
button.bind("", handle_click)

# Key press event
def handle_key(event):
    print(f"Key pressed: {event.char}")

root.bind("", handle_key)
Creating a Complete Tkinter Application
Let’s build a practical calculator application combining multiple concepts:
import tkinter as tk

class SimpleCalculator:
    def __init__(self, root):
        self.root = root
        self.root.title("Simple Calculator")
        self.root.geometry("300x400")

        # Display
        self.display = tk.Entry(root, font=("Arial", 16),
                                justify="right", state="readonly")
        self.display.grid(row=0, column=0, columnspan=4,
                         sticky="nsew", padx=5, pady=5)

        self.expression = ""

        # Buttons
        buttons = [
            ("7", 1, 0), ("8", 1, 1), ("9", 1, 2), ("/", 1, 3),
            ("4", 2, 0), ("5", 2, 1), ("6", 2, 2), ("*", 2, 3),
            ("1", 3, 0), ("2", 3, 1), ("3", 3, 2), ("-", 3, 3),
            ("0", 4, 0), (".", 4, 1), ("=", 4, 2), ("+", 4, 3),
        ]

        for (text, row, col) in buttons:
            self.create_button(text, row, col)

    def create_button(self, text, row, col):
        def on_press():
            if text == "=":
                self.calculate()
            else:
                self.expression += text
                self.update_display()

        btn = tk.Button(self.root, text=text, font=("Arial", 14),
                       command=on_press)
        btn.grid(row=row, column=col, sticky="nsew", padx=2, pady=2)

    def update_display(self):
        self.display.config(state="normal")
        self.display.delete(0, tk.END)
        self.display.insert(0, self.expression)
        self.display.config(state="readonly")

    def calculate(self):
        try:
            result = eval(self.expression)
            self.expression = str(result)
            self.update_display()
        except:
            self.expression = ""
            self.update_display()

root = tk.Tk()
app = SimpleCalculator(root)
root.mainloop()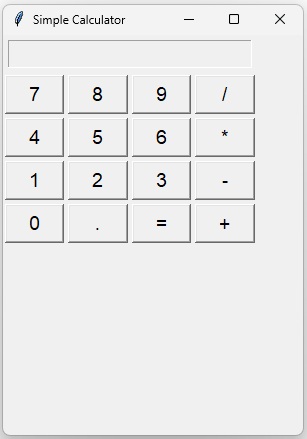
Advanced Tkinter Techniques
Using Frames for Organization
Frames group related widgets together:
frame = tk.Frame(root, bg="lightgray")
frame.pack(fill=tk.BOTH, expand=True)

label = tk.Label(frame, text="Inside a frame")
label.pack()
Creating Custom Widgets
Extend Tkinter functionality by creating custom widgets:
class CustomWidget(tk.Frame):
    def __init__(self, parent, **kwargs):
        super().__init__(parent, **kwargs)

        self.label = tk.Label(self, text="Custom Widget")
        self.label.pack()

        self.button = tk.Button(self, text="Action")
        self.button.pack()

root = tk.Tk()
widget = CustomWidget(root)
widget.pack()
root.mainloop()
Dialogs and Message Boxes
from tkinter import messagebox, filedialog

# Message box
messagebox.showinfo("Title", "This is an info message")
messagebox.showwarning("Warning", "Warning message")
messagebox.showerror("Error", "Error message")

# File dialog
file_path = filedialog.askopenfilename()
save_path = filedialog.asksaveasfilename()
Tkinter Best Practices
- Use Classes: Organize complex applications with object-oriented design
- Separate Logic and UI: Keep business logic independent from GUI code
- Handle Exceptions: Wrap operations in try-except blocks
- Use Constants: Define colors, fonts, and sizes as variables
- Responsive Design: Test applications on different screen sizes
- Validate Input: Check user input before processing
- Use Threads: Run long operations on separate threads to prevent freezing
Common Tkinter Pitfalls and Solutions
Frozen GUI During Long Operations
Use threading to run long operations without freezing the interface:
import threading
import tkinter as tk

def long_operation():
    # Simulate long operation
    for i in range(100):
        print(i)

button = tk.Button(root, text="Start",
                  command=lambda: threading.Thread(target=long_operation).start())
button.pack()
Variable Scope Issues
Keep references to widgets that you need to access later:
class App:
    def __init__(self, root):
        self.root = root
        # Store widget references as instance variables
        self.entry = tk.Entry(root)
        self.entry.pack()

    def get_text(self):
        return self.entry.get()
Comparing Tkinter with Other GUI Frameworks
| Framework | Ease of Use | Performance | Modern UI |
|---|---|---|---|
| Tkinter | Easy | Good | Basic |
| PyQt | Moderate | Excellent | Excellent |
| PySimpleGUI | Very Easy | Good | Limited |
| Kivy | Moderate | Good | Excellent |
Real-World Tkinter Project Examples
To-Do List Application
Build a productivity tool with Tkinter for managing daily tasks with features like adding, removing, and marking tasks as complete.
Weather Application
Create a desktop weather app that fetches data from an API and displays current conditions, forecasts, and weather trends.
File Manager
Develop a simple file browser with functionality to navigate directories, view files, and perform basic file operations.
Tkinter Performance Optimization
- Use geometry managers efficiently to reduce layout calculations
- Minimize widget creation and destruction during runtime
- Cache images and resources instead of loading repeatedly
- Use update_idletasks() for responsive UI during heavy operations
- Profile your application to identify bottlenecks
Extending Tkinter with Themes and Styling
Tkinter’s default appearance is basic, but you can customize styling using themes. Libraries like ttkbootstrap provide modern themes that enhance UI aesthetics.
from ttkbootstrap.constants import *
import ttkbootstrap as ttk

root = ttk.Window(themename="darkly")
root.title("Styled Tkinter App")

label = ttk.Label(root, text="Modern Styled Label", bootstyle="info")
label.pack(padx=20, pady=20)

button = ttk.Button(root, text="Click", bootstyle="success")
button.pack(padx=20, pady=10)

root.mainloop()
Tkinter with Data Visualization
Integrate Tkinter with matplotlib for embedding charts and graphs in desktop applications:
import tkinter as tk
from matplotlib.backends.backend_tkagg import FigureCanvasTkAgg
from matplotlib.figure import Figure

root = tk.Tk()
root.title("Tkinter + Matplotlib")

# Create figure
fig = Figure(figsize=(5, 4), dpi=100)
ax = fig.add_subplot(111)
ax.plot([1, 2, 3, 4], [1, 4, 2, 3])

# Embed in Tkinter
canvas = FigureCanvasTkAgg(fig, master=root)
canvas.draw()
canvas.get_tk_widget().pack(fill=tk.BOTH, expand=True)

root.mainloop()
Tkinter File Handling
Create applications that work with files using Tkinter’s built-in dialogs:
from tkinter import filedialog, messagebox
import os

def open_file():
    file_path = filedialog.askopenfilename(filetypes=[("Text files", "*.txt"), ("All files", "*.*")])
    if file_path:
        with open(file_path, 'r') as file:
            content = file.read()
            messagebox.showinfo("File Content", content[:100])  # Show first 100 chars

def save_file():
    file_path = filedialog.asksaveasfilename(defaultextension=".txt")
    if file_path:
        with open(file_path, 'w') as file:
            file.write("Sample content")
            messagebox.showinfo("Success", "File saved successfully!")

root = tk.Tk()
open_btn = tk.Button(root, text="Open File", command=open_file)
save_btn = tk.Button(root, text="Save File", command=save_file)
open_btn.pack(pady=10)
save_btn.pack(pady=10)
root.mainloop()
Debugging Tkinter Applications
Effective debugging techniques for Tkinter applications:
- Print Debugging: Use print() statements to track variable values and execution flow
- Event Tracing: Monitor event handling with event_generate() and event_info()
- Exception Handling: Wrap widget creation and callbacks in try-except blocks
- Testing Frameworks: Use unittest or pytest with mock objects for testing GUI logic
- Logging: Implement Python’s logging module for production applications
Tkinter Packaging and Distribution
Convert your Tkinter applications into standalone executables using tools like PyInstaller:
pip install pyinstaller

# Create executable
pyinstaller --onefile --windowed myapp.py

# The executable will be in the 'dist' folder
This command creates a single executable file that users can run without installing Python or dependencies.
Resources for Learning Tkinter
- Official Documentation: Python Tkinter Official Docs
- Tkinter Tutorial Sites: Real Python, W3Schools Python Tkinter
- Community: Stack Overflow, Reddit r/learnprogramming
- Books: “Programming Python” by Mark Lutz covers Tkinter extensively
- Video Courses: YouTube channels like Tech With Tim and Corey Schafer
Troubleshooting Common Tkinter Issues
Widget Not Displaying
Ensure you’ve called the geometry manager (pack, grid, or place) on your widget. Widgets won’t appear without it.
Application Freezing
Avoid long-running operations on the main thread. Use threading for tasks that take time to complete.
Memory Leaks
Properly destroy windows and widgets when no longer needed, especially in long-running applications.
Platform-Specific Issues
Test your application on all target platforms. Some styling and widget behaviors vary between Windows, macOS, and Linux.
Future of Tkinter Development
While Tkinter remains the standard Python GUI library, the ecosystem continues to evolve. New projects like tkinter-designer aim to simplify UI creation with visual builders. As Python GUI development progresses, Tkinter’s simplicity and built-in nature ensure its relevance for years to come.
Whether you’re creating simple utilities, data analysis tools, or full-featured desktop applications, Tkinter provides a solid foundation for GUI development in Python.